Every halftone has a smallest dot your screen can hold open and a largest dot it can keep from closing up. Between them is your printable dot range. Most software guesses it from the mesh count. A step wedge measures it on your own mesh, emulsion, exposure unit and washout, and the measurement beats the guess every time.
What the dot range is
- Minimum dot. Below this, highlight dots are too small to survive washout, or fall through the mesh. Light tones vanish.
- Maximum dot. Above this, shadow dots bridge into each other and print solid. Dark tones plug.
Set them on the film and the software moves every tone into the range you can print, instead of letting the ends fall off on press.
The mesh estimate, and why it is only a start
A common rule of thumb:
| Mesh | Starting dot range |
|---|---|
| Under 180 | 5% to 92% |
| 180 and up | 3% to 95% |
Coarse mesh has a harder time holding a tiny dot open, and a harder time keeping a heavy dot from bridging. This is shop lore, not physics. Your setup may hold 6% to 88% on 200 mesh. Believe the wedge.
Both ends of the range on one picture, and how a step wedge finds them (more video lessons):
Run the tests in this order
The order is the point. Each test only means something once the one before it passes.
- Film density. Print a solid bar and hold it to a light. If light comes through, stop and fix the film. See film positive not dark enough.
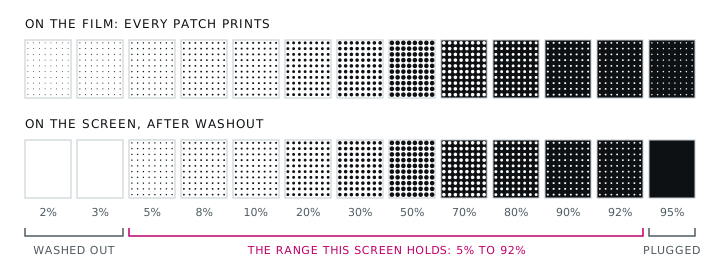
- Step wedge. Patches from 2% to 95%, printed at the job's own LPI and angle. Burn it on the mesh you will really use and wash it out. Read the lightest patch that held open and the heaviest that did not plug. That pair is your range.
- Scale. Print a 10-inch bar at 100% and measure it with a steel rule, tick center to tick center. If it reads 9.97 inches, the printer feeds 0.3% short. That is invisible on one film, and enough to stop a five-screen set from registering across a 14-inch print.
Reading the wedge
- Use the same LPI, angle and exposure as the job. A wedge at 35 LPI says nothing about a job at 55.
- Read the screen, not the film. The film always has every patch.
- Check under a loupe. A patch that looks open from a meter away may have half its dots closed.
- Write down the mesh, emulsion, exposure time and the range together. The range belongs to that combination.
In Halftoned
Pick the mesh you own and the ruling and starting dot range follow. The Calibration page prints the density bar, the step wedge at your job's ruling and angle, and the 10-inch scale bar. Enter what the screen held and it becomes the job's minimum and maximum dot, saved per printer and film stock so you do it once, not once per job. See LPI for your mesh, the preview or the pricing.